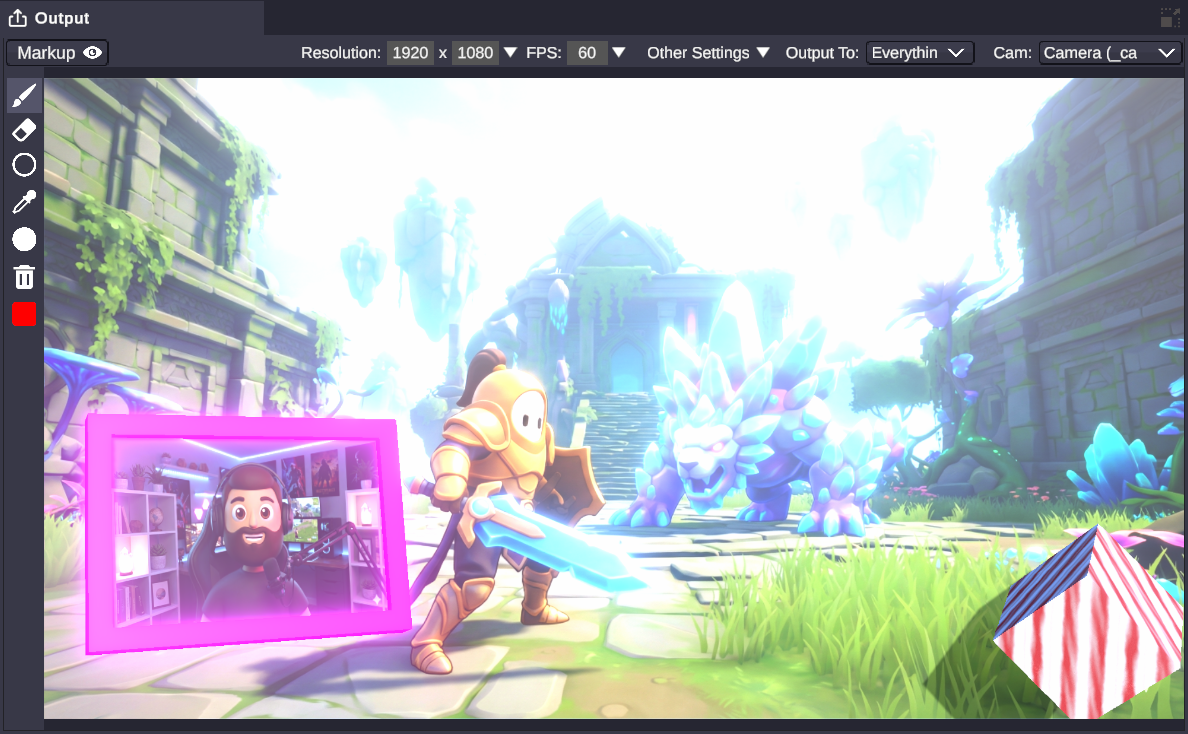
Output Panel
The Output panel is your control center for sending OverMox content to streaming software like OBS. Here you configure resolution, frame rate, and choose how to broadcast your scene to the world.
Understanding the Output Panel
Section titled “Understanding the Output Panel”The Output panel shows a live preview of what your audience will see. Above the preview are controls for:
- Resolution - Output dimensions in pixels
- Frame Rate - How many frames per second to render
- Camera - Which camera to broadcast
- Output To - How to send the video to streaming software
Resolution Settings
Section titled “Resolution Settings”Choose your output resolution from the dropdown or enter custom values.
Preset Resolutions
Section titled “Preset Resolutions”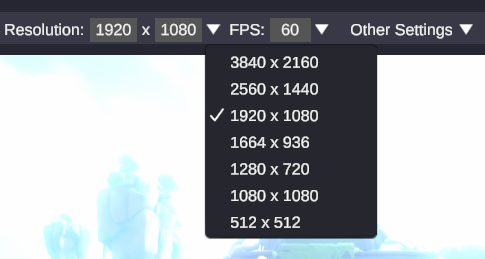
| Resolution | Best For |
|---|---|
| 3840 x 2160 | 4K streaming (requires powerful hardware) |
| 2560 x 1440 | 1440p streaming |
| 1920 x 1080 | Standard HD streaming (recommended) |
| 1664 x 936 | Reduced 1080p (better performance) |
| 1280 x 720 | 720p streaming (great for lower-end systems) |
| 1080 x 1080 | Square format (Instagram, TikTok) |
Custom Resolution
Section titled “Custom Resolution”Select “Custom” from the dropdown to enter any width and height. This is useful for:
- Matching your specific stream layout
- Creating content for non-standard aspect ratios
- Testing at lower resolutions during development
Frame Rate Settings
Section titled “Frame Rate Settings”Control how smoothly your output renders.
Preset Frame Rates
Section titled “Preset Frame Rates”| Frame Rate | Best For |
|---|---|
| Free | Maximum FPS your system can handle (uncapped) |
| 244 | High-refresh competitive content |
| 144 | High-refresh displays |
| 60 | Standard smooth streaming (recommended) |
| 30 | Lower-end systems or bandwidth-limited streams |
| 15 | Minimum supported (emergency fallback only) |
Custom Frame Rate
Section titled “Custom Frame Rate”Select “Custom” to enter any value (minimum 15 FPS).
Enable VSync to synchronize output with your monitor’s refresh rate. This can reduce screen tearing but may introduce slight input lag.
Camera Selection
Section titled “Camera Selection”If your scene has multiple cameras, use the Camera dropdown to choose which one provides the output. Each camera option shows:
- Camera name
- ItemTag identifier (in parentheses)
Switching Cameras
Section titled “Switching Cameras”When you select a different camera:
- The output smoothly transitions (if transitions are configured)
- The new camera becomes the “main” broadcast camera
- All output methods (Spout, NDI) automatically switch
This is perfect for:
- Switching between different angles
- Going from a wide shot to a close-up
- Cutting to a different virtual set
Output Methods
Section titled “Output Methods”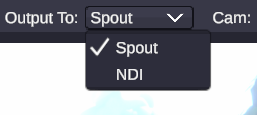
The “Output To” dropdown lets you choose how OverMox sends video to your streaming software. You can enable multiple outputs simultaneously.
Best for: OBS Studio on Windows
Spout is a real-time video sharing framework that sends frames directly to OBS without encoding. This is the fastest, highest-quality option.
Setup in OBS:
- Install the Spout2 Plugin for OBS
- Add a new “Spout2 Capture” source
- Select “OverMox” from the sender list
- The OverMox output appears instantly
Advantages:
- Zero latency
- Lossless quality
- Low CPU usage
- Supports transparency
Best for: Sending video over a network
NDI (Network Device Interface) broadcasts your output over your local network. Any NDI-compatible software can receive it.
Setup in OBS:
- Install OBS NDI Plugin
- Add a new “NDI Source”
- Select “OVERMOX” from the source list
Advantages:
- Works over network (different computers)
- Industry-standard protocol
- Compatible with many professional tools
Note: NDI has slightly more latency than Spout and uses some CPU for encoding.
Choosing Between Spout and NDI
Section titled “Choosing Between Spout and NDI”| Scenario | Recommended |
|---|---|
| OBS on same computer | Spout |
| OBS on different computer | NDI |
| Multiple programs need the feed | NDI |
| Lowest possible latency | Spout |
| Need network flexibility | NDI |
Transparent Background
Section titled “Transparent Background”Enable alpha channel transparency in the output. When active, areas with no content become transparent rather than show skybox or camera background color.
Why use transparency:
- Overlay OverMox on top of gameplay footage
- Layer multiple OverMox scenes
- Use OverMox as a browser source overlay
- Create clean keyed output for production
In OBS: Both Spout and NDI sources will receive the alpha channel automatically. Just make sure your OBS source isn’t set to ignore alpha.
Live Preview
Section titled “Live Preview”The main area of the Output panel shows a real-time preview of your broadcast output. This is exactly what your streaming software receives.
Preview vs Stage
Section titled “Preview vs Stage”| View | Purpose |
|---|---|
| Stage (3D viewport) | Edit and position objects with helper gizmos |
| Output Preview | See final broadcast-ready output |
The Output preview:
- Shows the exact crop and framing
- Displays post-processing effects
- Renders at your output resolution
- Includes any markup/drawing overlays
Streaming Workflow Examples
Section titled “Streaming Workflow Examples”Basic OBS Setup with Spout
Section titled “Basic OBS Setup with Spout”-
In OverMox:
- Set Resolution to 1920 x 1080
- Set Frame Rate to 60
- Enable Spout in “Output To”
-
In OBS:
- Add new “Spout2 Capture” source
- Select “OverMox”
- Position and resize as needed
Your OverMox scene now appears live in OBS.
Multi-Camera Stream
Section titled “Multi-Camera Stream”-
Create multiple cameras in your scene:
- “Main_Wide” - Full scene view
- “Closeup_Avatar” - Tight shot on your avatar
- “Alert_Angle” - Dramatic angle for celebrations
-
During stream, use the Camera dropdown to switch between shots
-
Configure transitions for smooth cuts
Network Preview Setup
Section titled “Network Preview Setup”Send a preview to your phone or tablet:
- Enable NDI output
- Download an NDI monitor app on your mobile device
- Connect to the same network
- Open the app and select “OVERMOX”
Now you can monitor your output from anywhere in your room.
Overlay on Gameplay
Section titled “Overlay on Gameplay”- Enable “Transparent BG” in OverMox
- Set up Spout output
- In OBS:
- Game Capture source at bottom
- Spout2 Capture (OverMox) above it
Your OverMox avatars and effects overlay on top of gameplay.
Performance Tips
Section titled “Performance Tips”If Output is Laggy
Section titled “If Output is Laggy”- Lower resolution - Try 1280x720 during setup
- Reduce frame rate - Drop to 30 FPS
- Disable unused outputs - Turn off NDI if only using Spout
- Check other applications - Close unnecessary programs
Optimizing for Quality
Section titled “Optimizing for Quality”- Match resolution to stream - No point rendering 4K for a 1080p stream
- Stable frame rate - Consistent 30 FPS looks better than fluctuating 45-60
- Use Spout locally - It’s faster than NDI on the same machine
Related
Section titled “Related”- Stage - Working in the 3D viewport
- Scene Objects - Objects in your scene
- Transitions - Smooth camera switching