Preferences
Access preferences through Edit → Preferences to customize how the node graph editor looks and behaves, and to manage the local OverMox API. The dialog has two tabs: General and API.
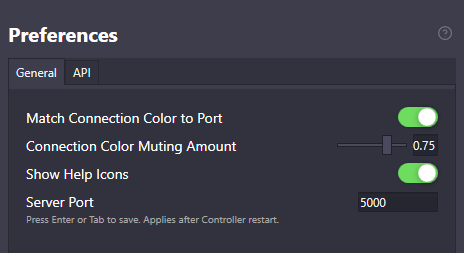
General
Section titled “General”The General tab controls the look and behavior of the node graph editor in OverMox Controller.
Match Connection Color to Port
Section titled “Match Connection Color to Port”When enabled, connection lines in the node graph match the color of their connected ports. This makes it easier to trace data flow at a glance.
| Setting | Effect |
|---|---|
| On (default) | Connections inherit port colors |
| Off | All connections use a neutral color |
Connection Color Muting Amount
Section titled “Connection Color Muting Amount”Controls how muted (desaturated) connection line colors appear. Adjust this slider to find a balance between visibility and visual clutter.
| Value | Effect |
|---|---|
| 0% | Full saturation (vibrant colors) |
| 75% (default) | Subtle, muted colors |
| 100% | Fully desaturated (grayscale) |
Other General Options
Section titled “Other General Options”| Setting | Description |
|---|---|
| Show Help Icons | Show or hide the inline help icons on nodes and ports |
| Server Port | The port the OverMox Controller listens on for the OverMox app to connect |
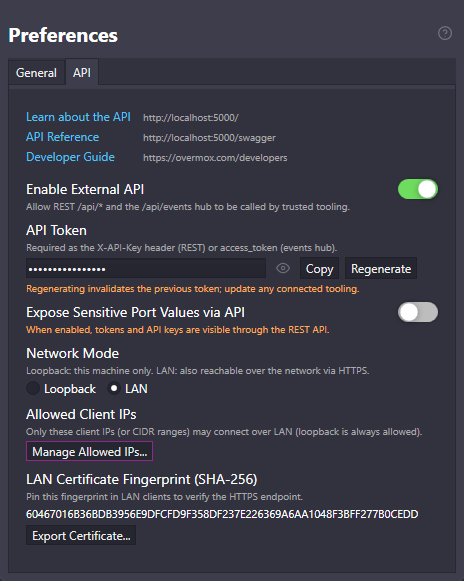
The API tab manages the local REST + events API that OverMox serves on your own machine at http://localhost:5000. Use it to turn the API on or off, manage the access token, and control who can reach it.
Enable API
Section titled “Enable API”A master on/off switch for the local API. When enabled, the REST and events API is available at http://localhost:5000. When disabled, no requests are served, regardless of the other settings on this tab.
Access Token
Section titled “Access Token”The credential that authenticates requests. For REST calls, send it in the X-API-Key header. For the realtime events hub (/api/events), send it as the access_token query parameter or a Bearer authorization header.
| Control | Description |
|---|---|
| Copy | Copy the current token to the clipboard |
| Regenerate | Issue a new token and invalidate the old one |
Network Mode
Section titled “Network Mode”Controls which machines can reach the API.
| Mode | Reach |
|---|---|
| Loopback (default) | This machine only - the safe default |
| LAN | Reachable from other devices on your local network |
Allowed IPs
Section titled “Allowed IPs”An IP allowlist that applies when Network Mode is set to LAN. Loopback clients (127.0.0.1, ::1) are always allowed regardless of this list. Click Manage Allowed IPs to open the Allowed Client IPs dialog, where you add and remove the addresses permitted to reach the API.
In the dialog, enter either a single IP address (for example 192.168.1.50) or a CIDR range (for example 192.168.1.0/24) and click Add:
| Outcome | What happens |
|---|---|
| Empty input | Rejected: “Enter an IP address or CIDR range.” |
| Not a valid IP or CIDR | Rejected: “Not a valid IP address or CIDR range (e.g. 192.168.1.50 or 192.168.1.0/24).” |
| Already in the list | Rejected: “That address is already in the list.” |
| Valid and new | Added in its canonical form; the input box clears |
Entries are normalized to a canonical form before they are stored, so format or casing variants of the same address are de-duplicated automatically. Each entry has a Remove button. A request from a LAN client is allowed when its address matches a listed IP exactly or falls inside a listed CIDR range (returning the normal 200); a non-loopback client that matches no entry is blocked with 403.
Certificate
Section titled “Certificate”Shows the TLS certificate fingerprint so you can verify you are talking to the right OverMox instance. Use the Export action to save the certificate for use by trusted client tools.
Expose Sensitive Port Values
Section titled “Expose Sensitive Port Values”Sensitive port values (such as tokens and keys) are redacted by default, and read responses include isSensitive and hasValue metadata so a client knows a value exists without seeing it. Writing to sensitive ports always works; only read responses are redacted. Enabling this setting returns the full values in read responses.
🎯 Reduce Visual Noise: If your node graphs feel overwhelming, increase the muting amount for softer connection lines.
🎯 Debug Data Flow: Turn on port color matching and reduce muting to clearly see which ports are connected.
🎯 Stay on Loopback: Keep Network Mode on Loopback unless you actually need to reach the API from another device.
🎯 Rotate Leaked Tokens: If your access token is ever exposed, use Regenerate to invalidate it and issue a fresh one.
🎯 Keep Secrets Hidden: Leave Expose Sensitive Port Values off unless a trusted local tool needs the raw values.
Related
Section titled “Related”- Node Graph - Working with the visual scripting canvas
- Keyboard Shortcuts - Editor shortcuts reference
- API Guide - The local REST + events API the API tab ties into