Project Panel
The Project panel is your file browser for managing all assets in your OverMox project. Use it to import media, create folders, and organize everything you need for your stream overlays and scenes.
Panel Overview
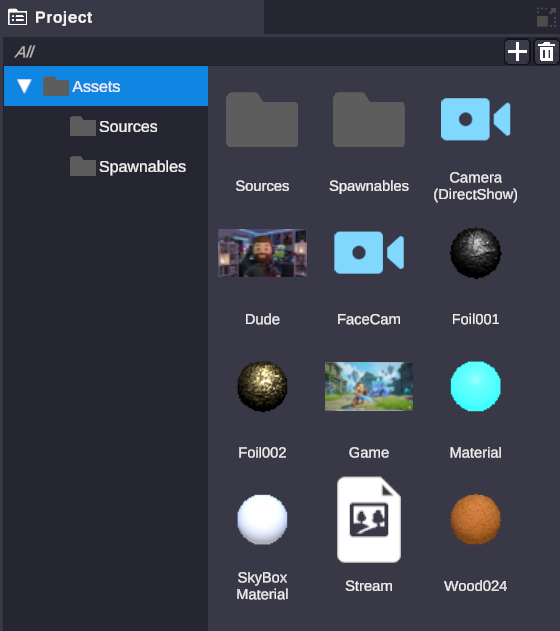
Section titled “Panel Overview”The Project panel has two main areas:
| Area | Description |
|---|---|
| Folder Tree (left) | Shows your folder hierarchy for navigation |
| Asset View (right) | Displays the contents of the selected folder |
Click a folder in the tree to see its contents. Double-click a folder in the asset view to open it.
Supported Asset Types
Section titled “Supported Asset Types”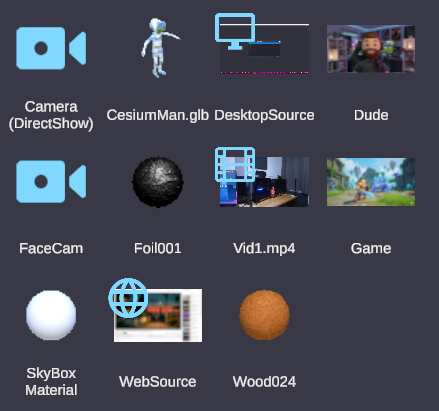
OverMox supports a wide variety of media formats:
Images
Section titled “Images”PNG, JPG, JPEG, SVG
Great for logos, overlays, backgrounds, and reaction images.
Videos
Section titled “Videos”MP4, AVI, MOV, WMV, WEBM, OGV, MPEG, MPG, M4V, ASF, DV, VP8
Perfect for animated backgrounds, video alerts, and pre-recorded content.
MP3, WAV, AIFF, AAC, ALAC, MP2, XM, XMA, VAG
Use for sound effects, music, and alert sounds.
3D Models
Section titled “3D Models”FBX, OBJ, GLTF, GLB, STL, PLY, 3MF, DAE, ZIP
Import custom 3D assets, avatars, and props for your scenes.
Animated Images
Section titled “Animated Images”GIF
Bring memes and animated reactions into your overlays.
Materials
Section titled “Materials”ZIP (containing texture maps)
Import PBR materials for realistic 3D object surfaces.
Importing Assets
Section titled “Importing Assets”There are several ways to bring assets into your project:
Right-Click Import
Section titled “Right-Click Import”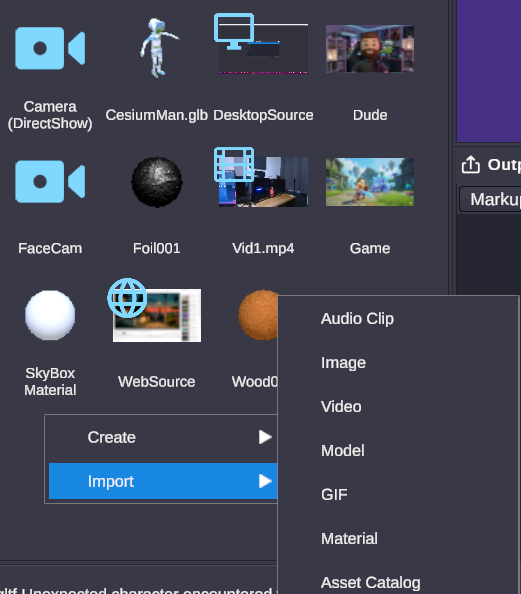
- Right-click in the asset view area
- Select Import from the context menu
- Choose the asset type you want to import
- Browse to select your file(s)
Asset Catalog
Section titled “Asset Catalog”Access the built-in Asset Catalog to browse and import pre-made assets:
- Right-click in the asset view
- Select Import > Asset Catalog
- Browse available assets and click to add them
Navigating Your Assets
Section titled “Navigating Your Assets”Folder Tree
Section titled “Folder Tree”The folder tree on the left shows your project structure:
- Click a folder to view its contents
- Double-click to expand/collapse subfolders
- Drag folders to reorganize your structure
Search and Filter
Section titled “Search and Filter”Use the search bar at the top of the Project panel to quickly find assets:
- Type any part of an asset name to filter
- Search works across all folders in your project
- Clear the search to return to normal browsing
Organizing Assets
Section titled “Organizing Assets”Creating Folders
Section titled “Creating Folders”Keep your project tidy by organizing assets into folders:
- Right-click in the asset view or folder tree
- Select Create > Folder
- Type a name for your new folder
- Press Enter to confirm
Renaming
Section titled “Renaming”To rename an asset or folder:
- Select the item
- Right-click and choose Rename (or press F2)
- Type the new name
- Press Enter to confirm
Moving Assets
Section titled “Moving Assets”Drag assets between folders to reorganize:
- Drag from the asset view to a folder in the tree
- Drag to a folder icon in the asset view
- Drop on a folder to move the asset inside
Working with Assets
Section titled “Working with Assets”Selecting Assets
Section titled “Selecting Assets”- Single click - Select an asset and view its properties in the Inspector
- Ctrl+Click - Add to selection (select multiple)
- Shift+Click - Select a range of assets
- Double-click - Open folders, or load scenes
Asset Preview
Section titled “Asset Preview”When you select an asset, you can see:
- Thumbnail preview in the asset view
- Detailed properties in the Inspector panel
- For media assets, resolution and format information
Using Assets in Your Scene
Section titled “Using Assets in Your Scene”To use an asset, drag it from the Project panel to:
- The Stage - Creates a new scene object with the asset
- The Hierarchy - Creates a new scene object
- The Inspector - Assigns it to a property field
Context Menu Options
Section titled “Context Menu Options”Right-click an asset to see available actions:
| Option | Description |
|---|---|
| Open | Opens folders, loads scenes |
| Duplicate | Creates a copy of the selected asset(s) |
| Delete | Removes the asset from your project |
| Rename | Edit the asset name |
| Show in Explorer | Opens the folder location on your computer |
Creating New Assets
Section titled “Creating New Assets”Beyond importing files, you can create certain assets directly:
Materials
Section titled “Materials”Right-click and select Create > Material to create a new material asset. Configure it in the Inspector to set colors, textures, and rendering options.
Sources
Section titled “Sources”Create live input sources for your stream:
- Video Device - Webcam or capture card input
- Window Capture - Capture a specific application window
- Desktop Capture - Capture your entire screen
- Web Source - Display a webpage or browser source
- NDI Source - Network video input
- Spout Source - Real-time video sharing
These appear as assets you can drag onto scene objects to display live content.
Tips for Organization
Section titled “Tips for Organization”Related
Section titled “Related”- Inspector - View and edit asset properties
- Hierarchy - Manage scene objects
- Assets Overview - Understanding assets in OverMox