Transitions
OverMox lets you switch between scenes instantly or with professional stinger transitions. Create smooth, broadcast-quality scene changes that rival dedicated production software.
Stinger Transitions
Section titled “Stinger Transitions”Stinger transitions are video-based transitions commonly used in professional broadcasts. Instead of a hard cut, a video plays that reveals the new scene.
How Stingers Work
Section titled “How Stingers Work”- You trigger a scene switch with a stinger
- The transition video starts playing
- Both scenes render simultaneously
- The video’s alpha (transparency) controls which scene is visible
- As the video plays, it gradually reveals the new scene
- The transition completes and the old scene deactivates
Track Matte
Section titled “Track Matte”The magic of stingers is the track matte - a grayscale video that controls visibility. Where the matte is white, you see the new scene. Where it’s black, you see the old scene. Gray values blend between them.
Creating Stinger Transitions
Section titled “Creating Stinger Transitions”Video Requirements
Section titled “Video Requirements”Your stinger video should include:
- The visual transition effect (swipes, wipes, logos, etc.)
- A track matte (alpha channel) that reveals the new scene
Supported formats: asf, avi, dv, m4v, mov, mp4, mpg, mpeg, ogv, vp8, webm, wmv
Track Matte Orientation
Section titled “Track Matte Orientation”Since most video formats don’t support alpha channels, the track matte is typically embedded in the video itself. OverMox supports two layouts:
| Orientation | Description |
|---|---|
| Side by Side | Left half is the visual, right half is the matte |
| Stacked | Top half is the visual, bottom half is the matte |
When creating your video, include both the visual transition and its matte in the same file using one of these layouts.
Using Source Alpha
Section titled “Using Source Alpha”If your video format supports alpha channels (like certain MOV files), enable Use Source Alpha to use the video’s built-in transparency instead of a track matte.
Stinger Properties
Section titled “Stinger Properties”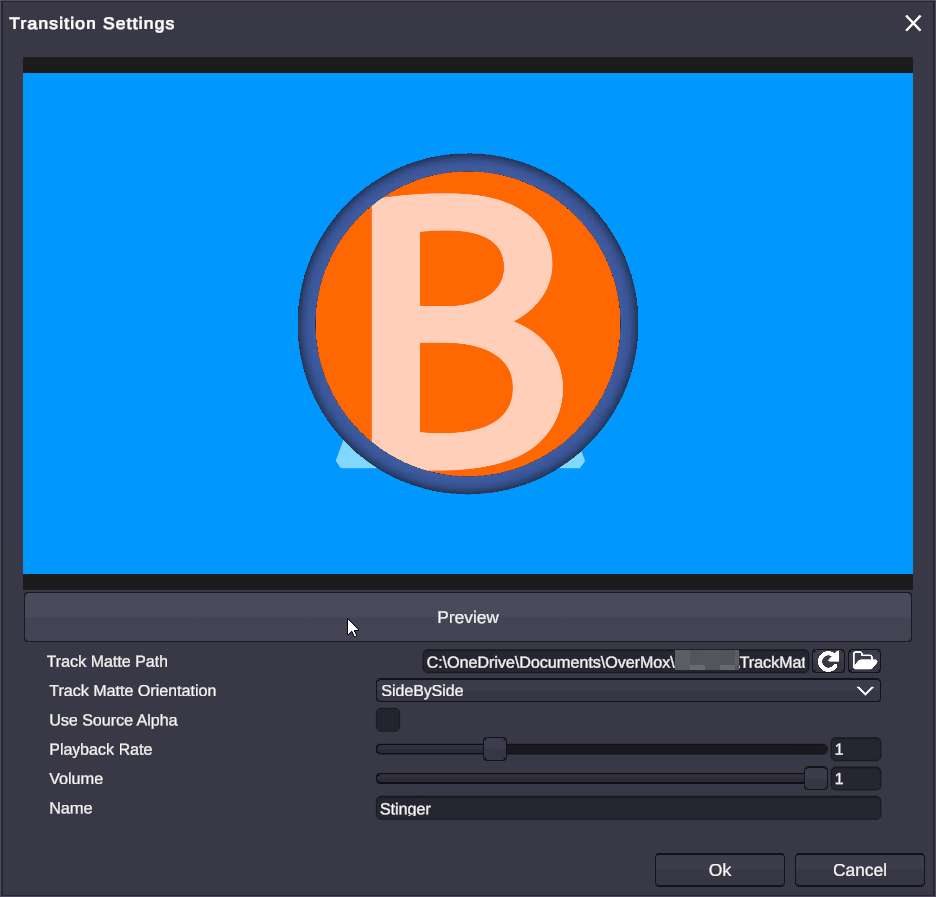
| Property | Type | Range | Description |
|---|---|---|---|
| Name | String | - | Identifier for this transition |
| Track Matte Path | File | Video file | The transition video file |
| Track Matte Orientation | Dropdown | Side by Side, Stacked | How the matte is laid out |
| Use Source Alpha | Boolean | - | Use video’s alpha channel instead of matte |
| Binary Alpha | Boolean | - | Hard edges (on/off) vs soft blending |
| Playback Rate | Float | 0 to 4 | Speed multiplier (1 = normal) |
| Volume | Float | 0 to 1 | Audio volume during transition |
Binary Alpha
Section titled “Binary Alpha”When enabled, the matte is treated as either fully opaque or fully transparent (no in-between values). This creates hard-edged transitions. When disabled, gray values in the matte create smooth blends.
Playback Rate
Section titled “Playback Rate”Adjust how fast the transition plays:
- 0.5 = Half speed (slower, more dramatic)
- 1.0 = Normal speed
- 2.0 = Double speed (faster, snappier)
Using Stingers
Section titled “Using Stingers”Setting Up a Stinger
Section titled “Setting Up a Stinger”- Import your stinger video to your project
- Open the Transitions panel
- Create a new stinger transition
- Assign your video file
- Set the track matte orientation
- Adjust properties as needed
Triggering Stingers
Section titled “Triggering Stingers”| Method | Description |
|---|---|
| Scene panel | Right-click a scene → Switch with transition |
| Hotkeys | Assign a shortcut to switch with a specific stinger |
| Node graphs | Use scene switch nodes with transition parameters |
Tips for Great Transitions
Section titled “Tips for Great Transitions”🎯 Keep it Short: Most professional stingers are 0.5-1.5 seconds. Longer transitions feel slow.
🎯 Match Your Brand: Use colors, logos, and motion styles consistent with your stream’s aesthetic.
🎯 Audio Matters: Include a satisfying sound effect in your stinger video for professional polish.
🎯 Test Both Ways: Make sure your stinger looks good going both to and from different scenes.
🎯 Prepare Multiple Stingers: Have different stingers for different mood changes - a dramatic one for game start, a quick one for camera switches.
Common Stinger Types
Section titled “Common Stinger Types”| Type | Description | Use Case |
|---|---|---|
| Logo Swipe | Your logo sweeps across, revealing new scene | General scene changes |
| Circle Wipe | Circular reveal from center or edge | Focus attention on center |
| Glitch | Digital distortion effect | Tech/gaming aesthetic |
| Bars/Blinds | Horizontal or vertical bars sweep | Clean, professional |
| Particle Burst | Particles explode revealing new scene | Celebration moments |
Technical Details
Section titled “Technical Details”Rendering During Transitions
Section titled “Rendering During Transitions”Both scenes render simultaneously during a stinger transition. OverMox uses a layer system to keep them separate:
- Scene A renders to one texture
- Scene B renders to another texture
- The stinger video controls which texture appears in the final output
This ensures smooth blending without visual artifacts.
Performance Considerations
Section titled “Performance Considerations”- Stinger transitions briefly double GPU rendering load
- Complex stinger videos add decoding overhead
- Keep stinger resolution reasonable (1080p is usually sufficient)
- Pre-rendered video stingers are more efficient than real-time effects
Related
Section titled “Related”- Output - Where your final video goes
- Scene Objects - What’s in your scenes