Assets
Assets are resources you import or create in the Project Panel. They act as the raw materials for your scenes - images, videos, web sources, and capture devices that you can place into the world or use as textures.
Table of Contents
Section titled “Table of Contents”- Web Source
- Capture Device
- Window Capture
- Desktop Capture
- NDI
- Spout
- Imported Media
- Materials & Organization
- MoxRelay Sources
Web Source
Section titled “Web Source”🏷️ Category: Project Asset
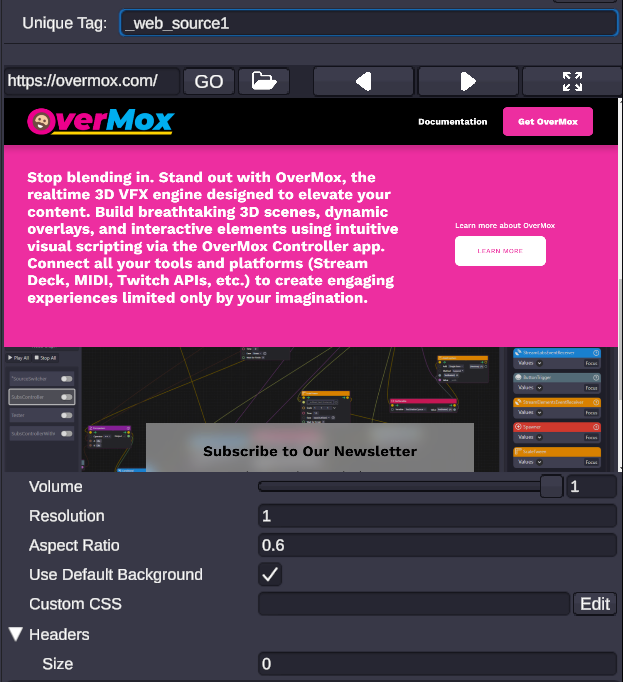
💡 Simple Explanation: A web browser you can put inside your 3D scene. Perfect for showing alerts, chat overlays, or any website.
⚙️ Technical Description: A fully interactive web browser component that can be placed in the 3D scene or used as a texture source. Supports mouse/keyboard input and transparency.
📖 Full Details & Properties
🔧 How It Works: Creates a Chromium-based web view that renders to a texture. You can interact with it just like a normal browser using your mouse and keyboard within the Editor. It supports transparent backgrounds, making it ideal for overlaying web-based alerts.
✨ Perfect For:
- Displaying StreamElements/Streamlabs alerts
- Showing Twitch chat in 3D space
- Embedding YouTube videos or music players
- Creating complex HTML/CSS based UIs
📋 Properties:
| Property | Type | Description |
|---|---|---|
URL |
String | The web address to load. |
Volume |
Float | Audio volume of the web page (0-1). |
Resolution |
Float | Pixel density. Lower values (e.g. 0.5) make content appear larger/zoomed in. |
Aspect Ratio |
Float | The width-to-height ratio of the browser window. |
Use Default Background |
Bool | If false, allows the web page’s transparency to show through. |
Custom CSS |
String | Inject custom CSS to style the page (e.g., hide scrollbars). |
Native 2D Mode |
Bool | (Mobile/Web only) Renders as a native 2D overlay for better performance. |
🎬 Streaming Example: “[Web Source] displaying a StreamElements alert box, placed floating next to your 3D avatar.”
🎯 Tips:
- Set
Use Default Backgroundto False for transparent alerts. - Use
Custom CSSto hide unwanted elements from websites. - Can be controlled via Web Nodes.
Capture Device
Section titled “Capture Device”🏷️ Category: Project Asset
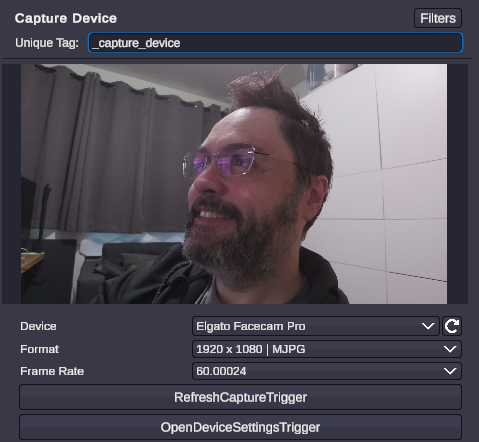
💡 Simple Explanation: Your real-world webcam or camera. Brings your real face into the virtual world.
⚙️ Technical Description: Captures video frames from a physical DirectShow capture device (webcam or capture card) connected to the system.
📖 Full Details & Properties
🔧 How It Works: Create it directly from the Source menu - it sits at the menu root, with no submenu. Connects to your system’s DirectShow video devices (webcams and capture cards) and streams the feed to a texture you can apply to any object in the scene.
✨ Perfect For:
- Showing your webcam feed on a virtual screen
- Using a capture card to show a console game
- Green screen effects (chroma keying via material)
📋 Properties:
| Property | Type | Description |
|---|---|---|
Device |
Enum | Select the physical camera device from the dropdown list. |
Format |
Enum | Select the capture resolution/format (e.g., 1920x1080). |
Frame Rate |
Enum | Select the capture frame rate (e.g., 30fps, 60fps). |
Restart Camera |
Button | Restarts the camera connection if video stops working. |
Open Device Settings |
Button | Opens the device’s driver settings dialog for advanced configuration. |
🎬 Streaming Example: “[Capture Device] applied to a TV screen object in the scene, showing your facecam.”
🎯 Tips:
- Use Open Device Settings to access hardware-specific controls like brightness, contrast, and zoom.
- If video freezes, click Restart Camera to reconnect.
- Can be switched at runtime using Camera Nodes.
Window Capture
Section titled “Window Capture”🏷️ Category: Project Asset
💡 Simple Explanation: Shows a specific app window (like Discord or Spotify) in your scene.
⚙️ Technical Description: Captures the visual buffer of a specific application window using Windows APIs.
📖 Full Details & Properties
🔧 How It Works: Hooks into a specific window handle and copies its visual output to a texture. This allows you to bring any running application into your 3D environment.
✨ Perfect For:
- Showing a specific program (e.g., code editor, art program)
- Displaying a “Now Playing” window from a music player
- Showing Discord chat
📋 Properties:
| Property | Type | Description |
|---|---|---|
Window |
Enum | Select the target window from the dropdown list. |
Capture Cursor |
Bool | Toggle whether the mouse cursor is visible in the capture. |
Capture Mode |
Enum | Auto, BitBlt (older, faster), or WindowsGraphicsCapture (newer, captures hardware accel). |
🎬 Streaming Example: “[Window Capture] showing your Spotify window, mapped to a floating plane in the background.”
🎯 Tips:
- If a window is black, try changing the Capture Mode.
- Minimized windows may not update.
Desktop Capture
Section titled “Desktop Capture”🏷️ Category: Project Asset
💡 Simple Explanation: Captures your whole screen. Good for showing everything you’re doing.
⚙️ Technical Description: Captures the entire output of a connected display monitor.
📖 Full Details & Properties
🔧 How It Works: Captures the full desktop output of a selected monitor. Useful for tutorials or when you need to show multiple windows.
✨ Perfect For:
- Full screen sharing
- Tutorials involving multiple apps
- Showing the taskbar and system tray
📋 Properties:
| Property | Type | Description |
|---|---|---|
Monitor |
Enum | Select the monitor to capture (Display 1, Display 2, etc.). |
Use HDR Renderer |
Bool | Enable if capturing an HDR-enabled display. |
🎬 Streaming Example: “[Desktop Capture] applied to a large virtual monitor behind you.”
🏷️ Category: Project Asset
💡 Simple Explanation: Receives video from other computers or NDI cameras on your network.
⚙️ Technical Description: Receives video streams over the local network via the NDI (Network Device Interface) protocol.
📖 Full Details & Properties
🔧 How It Works: Listens for NDI streams broadcast on your local network. This is the standard for high-quality local video transport.
✨ Perfect For:
- Dual-PC streaming setups
- Receiving video from mobile NDI camera apps
- Integrating with Skype/Zoom NDI outputs
📋 Properties:
| Property | Type | Description |
|---|---|---|
Source |
Enum | Select the NDI stream name from the network. |
🎬 Streaming Example: “[NDI] receiving the game feed from your gaming PC.”
🏷️ Category: Project Asset
💡 Simple Explanation: Super fast video sharing between apps on the same computer. Great for VJ tools.
⚙️ Technical Description: Receives zero-latency video frames from other applications on the same GPU via Spout.
📖 Full Details & Properties
🔧 How It Works: Shares GPU memory textures directly between applications. It has near-zero latency but only works locally on the same machine.
✨ Perfect For:
- Receiving visuals from Resolume, TouchDesigner, or OBS
- High-performance visual mixing
📋 Properties:
| Property | Type | Description |
|---|---|---|
Source |
Enum | Select the Spout sender name. |
🎬 Streaming Example: “[Spout] receiving a complex visualizer from TouchDesigner.”
Imported Media
Section titled “Imported Media”🏷️ Category: Project Asset
💡 Simple Explanation: Standard media files you import to use in your scene.
📖 Full Details & Properties
A standard 2D image asset.
Note: Supports PNG, JPG, BMP, TGA, PSD, GIF, and HDR formats.
| Property | Description |
|---|---|
| Texture | The actual image data displayed. |
| File Type | Indicates the type of file (e.g., Image). |
| Resolution | The width and height of the image in pixels. |
| Refresh Import | Reloads the image from the source file. |
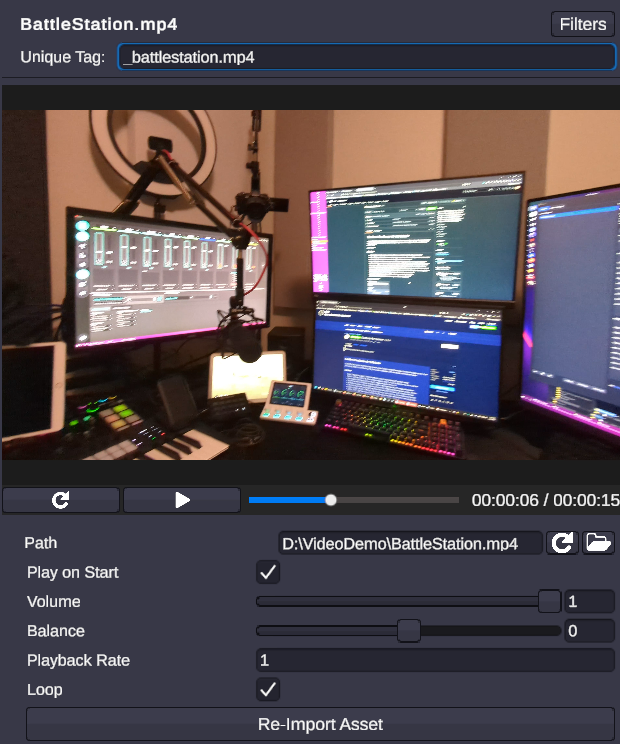
A video file asset.
Note: Supports MP4 (H.264/H.265), WEBM (VP8/VP9), MOV, AVI, WMV, and OGG/OGV.
| Property | Description |
|---|---|
| Play On Start | If checked, the video starts playing automatically when the scene loads. |
| Volume | The audio volume of the video (0.0 to 1.0). |
| Balance | Stereo balance (Left -1.0 to Right 1.0). |
| Playback Rate | The speed of playback (1.0 is normal speed). |
| Loop | If checked, the video will repeat indefinitely. |
| Time | Current playback time in seconds. |
| Duration | Total length of the video in seconds. |
| Is Done | Indicates if playback has finished. |
A 3D model asset (e.g., FBX, OBJ, GLB).
Note: Supports FBX, OBJ, GLB/glTF, STL, PLY, and 3MF formats.
| Property | Description |
|---|---|
| Importer | The underlying importer used to load the model. |
| Meshes | The 3D geometry data of the model. |
| Materials | The visual materials applied to the model’s surfaces. |
| Clips | Animation clips included with the model. |
| Refresh Import | Reloads the model and its dependencies from the source. |
An animated GIF asset.
| Property | Description |
|---|---|
| Texture | The current frame of the GIF displayed as a texture. |
| File Type | Indicates the file type (GIF). |
| Play | Starts playback of the GIF animation. |
| Pause | Pauses playback. |
| Refresh Import | Reloads the GIF from the source. |
🎬 Streaming Example: “Importing a ‘Be Right Back’ video loop and placing it on a screen.”
Materials & Organization
Section titled “Materials & Organization”🏷️ Category: Project Asset
💡 Simple Explanation: Tools for organizing your project and creating custom looks.
📖 Full Details & Types
Material (Standard)
Section titled “Material (Standard)”The default material type for most objects.
| Property | Description |
|---|---|
| Shader | The shader program used to render the material (e.g., Standard, Unlit). |
| Surface Type | Opaque (solid) or Transparent (see-through). |
| Global Texture Scale | Scales the texture tiling across the object (0.01 to 50). |
| Main Color | The primary color of the material. |
| Metallic | How metallic the surface looks. |
| Smoothness | How shiny/polished the surface looks. |
Physics Material
Section titled “Physics Material”Defines how an object interacts physically (bounciness, friction).
| Property | Description |
|---|---|
| Dynamic Friction | Friction when moving (0 = ice, 1 = sandpaper). |
| Static Friction | Friction when standing still. |
| Bounciness | How much the object bounces (0 = no bounce, 1 = super ball). |
| Friction Combine | How to combine friction with other objects (Average, Min, Max, Multiply). |
| Bounce Combine | How to combine bounciness with other objects. |
Scene Camera Material
Section titled “Scene Camera Material”A special material that displays the view from a Scene Camera.
| Property | Description |
|---|---|
| Source | Selects which Scene Camera to display. |
| Resolution | The resolution of the camera texture (Width x Height). |
| Texture | The generated render texture containing the camera view. |
MoxRelay Sources
Section titled “MoxRelay Sources”🏷️ Category: Project Asset
💡 Simple Explanation: MoxRelay sources let you bring a screen, a window, a webcam, a game, or media into OverMox as live materials you can use in your scene. These come from MoxRelay, a free, open-source app that relays them to other apps. OverMox has similar native source types built in for most of these, but MoxRelay offers an alternative if the native ones don’t quite fit your needs.
⚙️ Technical Description: MoxRelay runs as a separate app that OverMox installs, launches, and talks to on your PC. It relays each source locally and OverMox brings it in as a live material - nothing is streamed over a network and nothing leaves your computer.
📖 Full Details & Types
Each MoxRelay source arrives as a live material - a moving, always-current picture you can apply to any object in your scene:
| Type | What it brings in |
|---|---|
| camera | A webcam or capture-card video device |
| display | A whole monitor |
| window | A single application window |
| game | A game (hardware-accelerated) |
| media | A video file or stream, with play, pause, seek, and loop |
| image | A still image |
| color | A solid color |
| text | Rendered text |
What about audio? MoxRelay also offers two audio source types - a microphone or line-in, and system audio. Audio is handled on the MoxRelay side, so what comes into your OverMox scene is the picture. The per-source audio controls (mute, gain, balance, and sync) tune MoxRelay’s own audio handling on your PC; they don’t add sound to your scene.
Good to know:
- It’s optional. You only need MoxRelay when you want one of these live sources.
- Apply it like any other material. A MoxRelay source is a live material - apply it to an object and it shows the moving picture the source is relaying. See applying a material.
About MoxRelay. MoxRelay is a free, open-source app that runs alongside OverMox. You can read more or view the source on the MoxRelay project page on GitHub.
Install MoxRelay
You don’t need MoxRelay to use OverMox. The first time you add a MoxRelay source, OverMox offers to install it for you.
System requirements
- Windows, 64-bit. There’s no macOS or Linux build.
- An internet connection the first time you install MoxRelay, and whenever you choose to update it. OverMox downloads the supported release from the project’s public GitHub.
- Permission to install. The installer asks Windows for permission to install into Program Files - accept the standard prompt. If you can’t, MoxRelay can be installed per-user or by an administrator instead.
- One graphics card, or OverMox handles it for you. Live materials are handed off on the GPU, so OverMox and MoxRelay use the same one. On machines with more than one GPU, OverMox arranges this automatically.
Install from the prompt
When you add a MoxRelay source (or any time OverMox needs the app and it isn’t installed), you see a dialog titled Install MoxRelay? with three buttons.
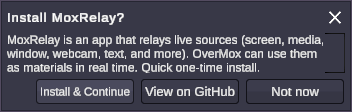
- Install & Continue - OverMox downloads the supported MoxRelay release, runs its installer, and brings it up for you. The dialog shows live progress, then closes once MoxRelay is installed and running. Your source connects automatically right after - there’s no second confirmation.
- Not now - Dismisses the dialog.
- View on GitHub - Opens the MoxRelay project page and leaves the dialog open.
For most people, Install & Continue is the way to go.
During install, Windows shows a standard install prompt so MoxRelay can install into Program Files. Accept it to continue. If you can’t accept it on your account, MoxRelay can be installed per-user, or installed separately by an administrator.
Other ways to install or reinstall
- MoxRelay > Install MoxRelay - this menu entry greys out once MoxRelay is installed.
- Edit > Settings > MoxRelay > Install / Reinstall MoxRelay - always available, so you can use it to repair or reinstall. The panel shows a live status line (“MoxRelay is installed…” or “MoxRelay is not installed…”) and the button steps through Checking, Downloading, Installing, and Installed.
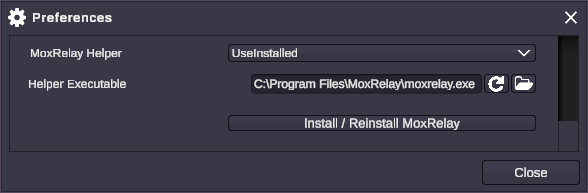
Installing and updating download from the project’s public GitHub, so they need an internet connection. If the download can’t finish - you’re offline, it’s blocked, or the transfer is interrupted - nothing is installed (there’s no half-installed state) and OverMox reports the failure. Reconnect and run the install again.
Add & configure a source
Once MoxRelay is installed, you add a source from the Create menu and set it up in the Inspector.
Add a source
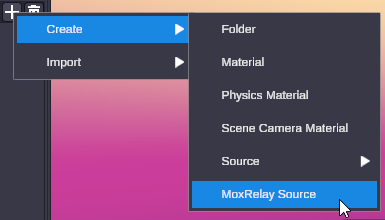
- Create the source. Use Create > MoxRelay Source. OverMox makes a new, blank MoxRelay source and selects it.
- OverMox starts MoxRelay for you. If MoxRelay isn’t running yet, the panel brings it up and shows a brief “Waiting for MoxRelay to start…” message. If MoxRelay isn’t installed, you’ll see “MoxRelay isn’t available yet. Install it to add MoxRelay sources.” with an inline Install MoxRelay button.
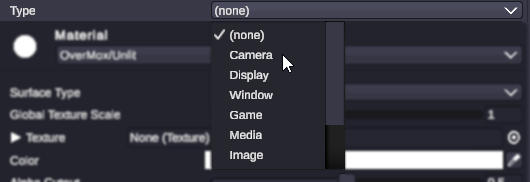
- Pick a Type. In the Inspector, open the Type dropdown and choose what to bring in - camera, display, window, game, media, image, color, or text. This list comes live from MoxRelay, so it matches exactly what your installed version supports.
- That’s it. Picking a Type is the create action. OverMox names the source for you (for example “MoxRelay Camera”), creates the matching source inside MoxRelay, and connects it. There’s no separate Create button and no name to fill in.
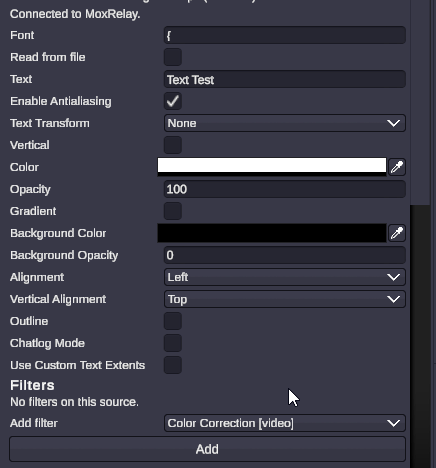
Once created, the Inspector switches to the configured view: a header, a short description with a “Learn more” link, a live preview, a connection-status line, the source’s settings, a filter chain, audio controls, a read-only sender line, and a Stop button.
Your MoxRelay sources persist in the project like any other asset. When you reopen the project, OverMox reconnects them automatically as soon as MoxRelay is available - you don’t recreate them each session.
Use it in your scene
A MoxRelay source is a live material, so you use it the same way as any other material: apply it to an object (for example, drag the source onto the object, or assign it as the object’s material). The object then shows the moving, always-current picture the source is relaying. For how materials work in general, see applying a material.
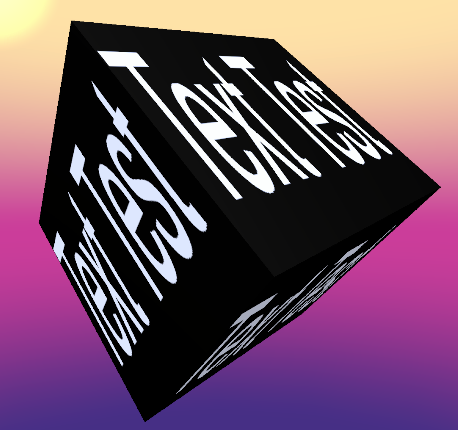
The sender (chosen for you)
For a MoxRelay source you don’t pick the output by hand. The output is decided by the Type you chose, and OverMox binds to the matching MoxRelay output automatically. It shows this on a read-only line as Sender: <name> (or Sender: (not bound) until it connects).
Per-Type settings
Each Type shows its own settings in the Inspector (the list comes live from MoxRelay, so it matches your chosen Type). Changes apply live.
| Type | What you set |
|---|---|
| camera | The video device (a webcam or capture-card input) and its device options |
| display | Which monitor to show |
| window | Which open application window to show |
| game | The game or application to show |
| media | The video file or stream, with play, pause, seek, and loop |
| image | The image file |
| color | The solid color |
| text | The text, and its font and styling |
A camera, display, or window source starts blank until you point it at something - pick a device, a monitor, or a window, and the picture appears. (A display source won’t auto-pick a monitor.) Image, color, and text sources start with sensible defaults.
Filters
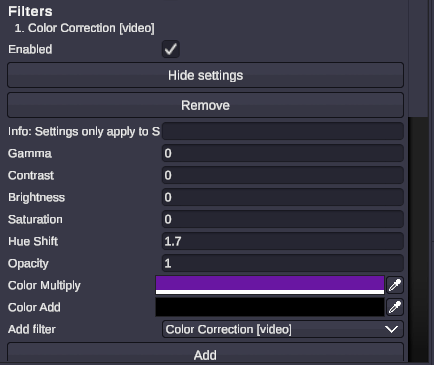
A source has a filter chain you can edit in the Inspector. Add a filter from the available list, and each filter in the chain gets its own row with an enable/disable toggle, Move up / Move down to reorder it, Remove, and Settings to expand and edit its options inline. Filters apply in order, top to bottom.
The available set is large - color correction, keying, crop and pad, masks and blend, LUT, scaling, scroll, sharpen, delay, and tone mapping, plus audio filters. Add, reorder, and configure as many as you need.
Audio controls
A source has per-source audio controls - mute, gain, balance, and a sync offset, with a level meter. These tune how MoxRelay handles and plays that audio on your PC. They don’t add sound to your OverMox scene; what a MoxRelay source brings into the scene is the picture.
Frame rate
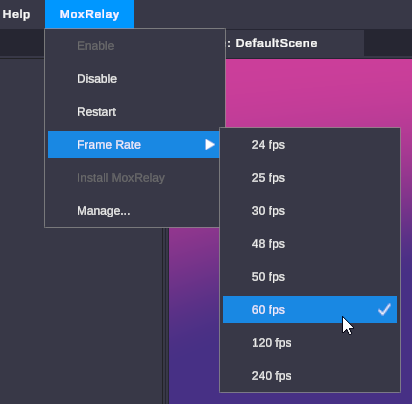
One global delivery frame rate applies to everything MoxRelay relays. Choose it from MoxRelay > Frame Rate: eight presets (24, 25, 30, 48, 50, 60, 120, and 240 fps), with 60 as the default. Higher rates look smoother and cost more GPU and CPU. If MoxRelay is already running when you change the rate, OverMox offers to restart it, because the rate is set when MoxRelay launches.
Helper mode
Edit > Settings > MoxRelay > MoxRelay Helper controls whether and how OverMox runs MoxRelay:
- UseInstalled (default) - use the version OverMox installed for you. Most people stay here.
- Off - never launch MoxRelay. Existing sources go inactive and OverMox stops prompting you to install. Use this to turn the feature off without deleting your sources.
- UseDevPath (advanced) - point OverMox at a specific
moxrelay.exeyou supply. For developers running their own build.
Good to know
- Resolution. A live material arrives at the source’s own native resolution. OverMox shows it read-only in the source’s stats strip.
- Pixel format. Each source has a pixel format (standard 8-bit by default). OverMox shows it read-only as Format; most people never change it.
- Stats strip. The live preview has an optional stats strip (toggle it with the Stats / Hide stats button) showing Resolution, Format, whether frames are flowing, and the delivery frame rate.
- GPU. Nothing to set. On machines with more than one GPU, OverMox automatically tells MoxRelay to use the same one OverMox renders on.
- A source appears after its first frame. A newly created or just-changed source can take a moment to show up.
Manage & troubleshoot
The MoxRelay menu
The MoxRelay menu collects the controls for the app OverMox manages.
- Install MoxRelay - Installs MoxRelay; greys out once it’s installed.
- Enable / Disable - Turns the feature on or off without deleting sources. Disable remembers your previous mode; Enable restores it.
- Restart - Stops and relaunches the MoxRelay helper OverMox manages. The go-to fix for a source that started but didn’t finish connecting.
- Frame Rate - The one global delivery rate, with the active rate checked.
You can create as many MoxRelay sources as you like, including several of the same Type - OverMox auto-names them.
Update MoxRelay
OverMox stays on a supported, known-good release and never updates MoxRelay on its own. Updating is your choice.
- When a newer release exists, Edit > Settings > MoxRelay shows an informational notice (“A newer MoxRelay is available.”) and an Update button. The check runs only when MoxRelay is installed.
- Click Update to install the newer release. OverMox re-checks, installs it (this needs an internet connection), and brings MoxRelay back up. If you’re already current, it says so and clears the notice.
- Ignoring the notice is fine. The supported release keeps working.
Turn off, stop, or remove
These are three different actions:
- Turn MoxRelay off (keep your sources). Use MoxRelay > Disable, or set the Settings helper mode to Off. OverMox stops the MoxRelay it launched and remembers your previous mode, so Enable restores it. While off, source inspectors say “MoxRelay is disabled.”
- Stop the running helper (without disabling). A configured source’s Stop MoxRelay button stops a MoxRelay that OverMox launched. It only works for a helper OverMox started - one you started yourself isn’t stopped from here. MoxRelay may start again on its own if a source still needs it.
- Remove a source. Delete the MoxRelay source like any other asset. OverMox confirms, and removing it also removes the matching source from MoxRelay.
Uninstall MoxRelay itself through Windows, like any other app (Windows Settings > Apps). There’s no in-app uninstaller. In OverMox, Off is how you stop using MoxRelay without uninstalling it.
Connection states
You’ll see one of these on a source:
- Connected - MoxRelay is running and reachable; the Type list and live controls work. (“Connected to MoxRelay.”)
- Starting - OverMox launched MoxRelay, or is about to, but it isn’t reachable yet. (“Waiting for MoxRelay to start…”)
- Not connected - no MoxRelay is reachable (it’s off, disabled, or not installed). OverMox still shows any live sources it can already see, but the Type list is empty, so you can’t add new ones until you install, enable, or restart MoxRelay.
Troubleshooting
- “Install MoxRelay?” keeps appearing. MoxRelay is wanted but not installed (or its recorded location no longer exists). This is the normal first-run state. Click Install & Continue; OverMox downloads the supported release, runs the installer (accept the Windows prompt), and connects automatically. If you turned MoxRelay Off, the prompt stays suppressed on purpose.
- A source stays blank or won’t connect. Usually MoxRelay isn’t installed (install it), is Off (enable it from the MoxRelay menu), or started but didn’t finish connecting (try MoxRelay > Restart, or Edit > Settings > MoxRelay > Install / Reinstall to repair). An empty Type list is by design until MoxRelay connects - it isn’t a bug.
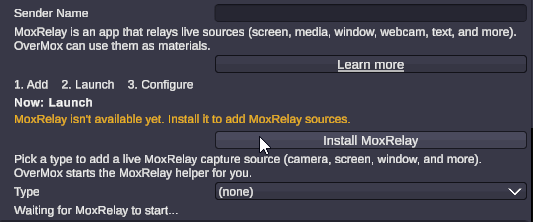
- Install or update fails, or you’re offline. Installing and updating download from the project’s public GitHub, so they need an internet connection. If the download can’t finish, nothing is installed (no half-installed state) and OverMox reports the failure. Reconnect and run the install again from the dialog, MoxRelay > Install MoxRelay, or Edit > Settings > MoxRelay > Install / Reinstall.
- The Windows permission prompt was declined. The installer needs permission to install into Program Files. If you decline, nothing is installed and OverMox reports the cancellation. Run the install again and accept the prompt. If your account can’t accept it, install with an administrator account or use a per-user install.
- A first-run SmartScreen or antivirus notice. On some systems, Windows SmartScreen or your antivirus may show a first-run notice for a freshly downloaded installer. This is normal for new downloads - continue through the standard Windows prompt.
- Sources are choppy or laggy. Each MoxRelay instance can sustain only so many live materials at once, at a given rate and resolution. If sources stutter, lower the Frame Rate (MoxRelay > Frame Rate) and run fewer sources at a time. Higher frame-rate tiers look smoother but cost more and reduce how many sources can run together.
- Black or slow output on a two-GPU machine. OverMox and MoxRelay need to use the same GPU. OverMox normally pins this automatically; if the output comes through black or slow on a multi-GPU machine, use MoxRelay > Restart after making sure your OverMox install is intact.
- “A newer MoxRelay is available.” Informational only. OverMox stays on a supported release and never auto-updates. Click Update if you want the newer one (needs an internet connection), or ignore it - the supported release keeps working.
- A leftover MoxRelay from a previous session. If OverMox closed unexpectedly, it cleans up its own leftover helper automatically the next time you open a project. A standalone MoxRelay you started yourself is never touched - close that one yourself if needed.
- You uninstalled MoxRelay but a scene still has sources. Your sources aren’t lost. They go inactive and show a saved snapshot with an inline Install MoxRelay button. Reinstall and OverMox reconnects them automatically. If two same-named sources make reconnection ambiguous, the Inspector warns you and suggests recreating one so it gets a stable id.
FAQ
- Do I need MoxRelay to use OverMox? No. It’s optional, and only needed for MoxRelay live sources.
- Does OverMox include MoxRelay inside it? No. OverMox downloads and runs the standalone installer for a supported release, then remembers where it landed.
- Do I need to be online? Only to install or update MoxRelay (the download comes from the project’s public GitHub). Once installed, MoxRelay runs entirely on your local machine.
- Will OverMox update MoxRelay without asking? No. It stays on a supported release and never auto-updates; updating is a button in Settings.
- I turned MoxRelay off - will it still prompt me to install? No. Off suppresses both auto-launch and the install prompt.
- Can OverMox close a MoxRelay I started myself? No. It only stops a helper it launched; a standalone one you started is left alone.
- Do I need to open a firewall port? No. MoxRelay talks to OverMox only on your local machine. Windows may show a first-run firewall prompt; allowing it is fine, but it isn’t required for OverMox.
- Does a MoxRelay source bring audio into my scene? No. What reaches your scene is the picture. The per-source audio controls affect MoxRelay’s own audio handling on your PC, not sound in the scene.
- What resolution does a source come in at? Its own native resolution, shown read-only in the source’s stats strip.
- What does Frame Rate do? Sets one global delivery frame rate (24 to 240 fps) for everything MoxRelay relays. Changing it while MoxRelay is running offers a restart.
- What is the dev path option? An advanced mode to point at your own build of MoxRelay. Leave it on UseInstalled unless you’re a developer.
- Why is the Type list empty? No MoxRelay is connected yet. Install, enable, or restart MoxRelay.