Variables Panel
The Variables panel lets you create, edit, and organize variables that your node graphs can read and write. Access it from the Graph Settings menu in the node graph editor.
Panel Overview
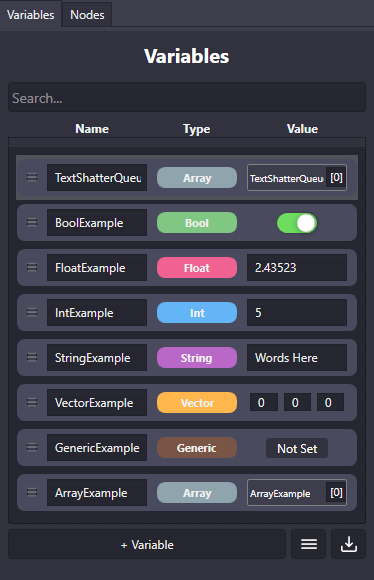
Section titled “Panel Overview”The Variables panel displays all variables in your project with columns for:
| Column | Description |
|---|---|
| Name | Variable identifier (click to edit) |
| Type | Data type (Int, Float, String, Bool, Vector, Array) |
| Value | Current value (editable) |
Click any column header to sort the list.
Creating Variables
Section titled “Creating Variables”
- Click the + Variable button at the bottom of the panel
- A new variable appears with a default name
- Edit the name, choose a type, and set an initial value
Variable names must be unique. If you enter a duplicate name, a number suffix is added automatically.
Editing Variables
Section titled “Editing Variables”Inline Editing
Section titled “Inline Editing”- Name: Click the name field and type
- Type: Use the dropdown to change the variable type
- Value: Edit directly in the value column
Value Editors by Type
Section titled “Value Editors by Type”| Type | Editor |
|---|---|
| Int / Float | Number input field |
| String | Text input field |
| Bool | Toggle switch |
| Vector | Three fields (X, Y, Z) |
| Array | Popup editor for managing items |
Variable Info Window
Section titled “Variable Info Window”For larger text values or detailed editing, right-click a variable and select Open Info Window to get a larger editing area.
Variable Actions
Section titled “Variable Actions”Right-click a variable (or use the menu button) for these options:
| Action | Description |
|---|---|
| Open Info Window | Large editor for the variable value |
| Create Get Node | Add a Get Variable node to your graph |
| Create Set Node | Add a Set Variable node to your graph |
| Delete | Remove the variable from your project |
Searching and Filtering
Section titled “Searching and Filtering”Type in the search box at the top to filter variables by name. The search matches from the beginning of variable names and is case-insensitive.
Importing Variables
Section titled “Importing Variables”Import variables from another OverMox project:
- Click the Import button (folder icon)
- Select a valid OverMox project folder
- All variables from that project are added to your current project
This is useful for reusing variable setups across multiple projects.
🎯 Quick Node Creation: Right-click a variable and choose “Create Get Node” or “Create Set Node” to instantly add the node to your graph.
🎯 Naming Convention: Use descriptive names like donation_total or is_live so you can easily find variables later.
🎯 Sort by Type: Click the Type column header to group similar variables together.
Related
Section titled “Related”- Variables - Understanding variables and their types
- Variables Nodes - Nodes for reading and writing variables
- Node Graph - The visual scripting canvas