Filters
Filters let you apply real-time visual effects to your assets - adjust colors, blur backgrounds, add noise, remove green screens, and much more. Apply multiple filters in sequence to create complex effects, all without leaving OverMox.
Filters work on assets like images, videos, video captures, and materials. Access the Filters window from the Window menu, then select an asset to see and edit its filters.
How Filters Work
Section titled “How Filters Work”Adding Filters
Section titled “Adding Filters”- Select an asset in the Project window
- Open the Filters window (Window menu)
- Click the add filter button and choose from the categories
- Adjust the filter properties to taste
Filter Stacking
Section titled “Filter Stacking”Filters apply sequentially from top to bottom. The output of one filter becomes the input for the next. This means order matters - a blur applied before color correction gives different results than color correction before blur.
Use the up/down buttons to reorder filters in the stack.
Enabling and Disabling
Section titled “Enabling and Disabling”Each filter has an Enabled checkbox. Disable filters to temporarily remove their effect without deleting them - useful for comparing before/after or troubleshooting complex stacks.
Masking
Section titled “Masking”All filters support optional masking. When masking is enabled, the filter only applies where the mask texture is white (or bright). Black areas remain unaffected. This lets you apply effects to specific regions of an asset.
| Property | Type | Description |
|---|---|---|
| Use Mask | Boolean | Enable mask-based filtering |
| Mask | Texture | Grayscale texture controlling where the filter applies |
Color Correction
Section titled “Color Correction”Adjust colors, brightness, contrast, and perform color space conversions.
Contrast Brightness
Section titled “Contrast Brightness”💡 Simple Explanation: Adjusts how light/dark and punchy your image looks.
⚙️ Technical Description: Controls overall brightness and contrast with optional per-channel coefficient adjustments for fine-tuned color grading.
📖 Full Details & Properties
🔧 How It Works: Brightness shifts all colors lighter or darker uniformly. Contrast controls the difference between light and dark areas - higher contrast makes lights lighter and darks darker. The channel coefficients let you adjust how much each color channel contributes.
✨ Perfect For:
- Making washed-out webcam footage pop
- Darkening backgrounds
- Creating high-contrast stylized looks
📋 Properties:
| Property | Type | Range | Description |
|---|---|---|---|
| Brightness | Float | -100 to 100 | Overall lightness adjustment |
| Contrast | Float | -100 to 100 | Difference between lights and darks |
| Red Coefficient | Float | 0 to 1 | Red channel contribution |
| Green Coefficient | Float | 0 to 1 | Green channel contribution |
| Blue Coefficient | Float | 0 to 1 | Blue channel contribution |
| Alpha Coefficient | Float | 0 to 1 | Alpha channel contribution |
🎬 Streaming Example: “Boost contrast on your webcam feed to make yourself stand out against a busy background.”
🎯 Tips: Start with small adjustments (±10-20) for natural looks. Use the coefficients to warm up (boost red) or cool down (boost blue) your footage.
Hue Saturation Lightness
Section titled “Hue Saturation Lightness”💡 Simple Explanation: Shift colors, make them more or less vibrant, and adjust brightness.
⚙️ Technical Description: HSL color space adjustments allowing hue rotation, saturation scaling, and lightness modification.
📖 Full Details & Properties
🔧 How It Works: Hue rotates all colors around the color wheel - shift reds to oranges, blues to purples, etc. Saturation controls color intensity - reduce to desaturate toward grayscale, increase for more vivid colors. Lightness adjusts overall brightness in the HSL color model.
✨ Perfect For:
- Color grading footage to match your brand
- Creating mood shifts (warm/cool)
- Quick color corrections
📋 Properties:
| Property | Type | Range | Description |
|---|---|---|---|
| Hue | Float | -180 to 180 | Color rotation in degrees |
| Saturation | Float | -100 to 100 | Color intensity adjustment |
| Lightness | Float | -100 to 100 | Brightness adjustment |
🎬 Streaming Example: “Shift hue to make your starting-soon screen match your purple brand colors.”
🎯 Tips: Hue of 180 or -180 gives you complementary colors. Saturation at -100 creates a full grayscale effect.
Color Overlay
Section titled “Color Overlay”💡 Simple Explanation: Tints your entire image with a single color.
⚙️ Technical Description: Applies a solid color overlay that blends with the source image.
📖 Full Details & Properties
🔧 How It Works: The overlay color is blended with every pixel of the source image. Use partially transparent colors for subtle tints, or solid colors for strong effects.
✨ Perfect For:
- Quick color washes
- Tinting alerts or overlays
- Creating consistent color themes
📋 Properties:
| Property | Type | Description |
|---|---|---|
| Overlay | Color | The color to overlay (RGBA) |
🎬 Streaming Example: “Add a red tint to your alert images when something dangerous happens in-game.”
🎯 Tips: Use low alpha values (10-30%) for subtle tints that don’t overpower your content.
Color Space
Section titled “Color Space”💡 Simple Explanation: Converts between linear and gamma color spaces.
⚙️ Technical Description: Performs color space conversion between linear and gamma-corrected color spaces for proper color pipeline management.
📖 Full Details & Properties
🔧 How It Works: Different parts of the rendering pipeline expect colors in different formats. Linear color space is mathematically correct for lighting calculations, while gamma space matches how monitors display colors. This filter converts between them.
✨ Perfect For:
- Fixing washed-out or overly dark imported images
- Correcting color pipeline mismatches
- Technical color corrections
📋 Properties:
| Property | Type | Options | Description |
|---|---|---|---|
| Space | Dropdown | Linear, Gamma | Target color space |
🎬 Streaming Example: “Fix an imported overlay that looks washed out by converting it to the correct color space.”
🎯 Tips: If colors look wrong after import, try toggling the color space. Most web images are in gamma space.
Gray Scale
Section titled “Gray Scale”💡 Simple Explanation: Converts your image to black and white.
⚙️ Technical Description: Converts to grayscale using configurable luminance weights for each color channel.
📖 Full Details & Properties
🔧 How It Works: Each pixel’s color is converted to a gray value based on weighted contributions from red, green, and blue channels. The default weights approximate how human eyes perceive brightness (green appears brightest, blue darkest).
✨ Perfect For:
- Classic black-and-white looks
- Dramatic scene transitions
- Desaturated “serious mode” aesthetics
📋 Properties:
| Property | Type | Range | Default | Description |
|---|---|---|---|---|
| Red Luminance | Float | 0 to 1 | 0.222 | Red channel weight |
| Green Luminance | Float | 0 to 1 | 0.707 | Green channel weight |
| Blue Luminance | Float | 0 to 1 | 0.071 | Blue channel weight |
🎬 Streaming Example: “Switch your webcam to grayscale during ‘serious discussion’ segments.”
🎯 Tips: The default weights are perceptually accurate. Adjust them for artistic effects - boost red luminance for brighter skin tones.
Sharpen
Section titled “Sharpen”💡 Simple Explanation: Makes edges and details crisper.
⚙️ Technical Description: Enhances edge definition by increasing local contrast around detail boundaries.
📖 Full Details & Properties
🔧 How It Works: The filter detects edges in the image and increases contrast along them, making details appear sharper. Higher strength values create more pronounced sharpening but can introduce artifacts.
✨ Perfect For:
- Improving soft webcam footage
- Making text overlays crisp
- Enhancing detail in game captures
📋 Properties:
| Property | Type | Range | Default | Description |
|---|---|---|---|---|
| Strength | Float | 0 to 10 | 2 | Sharpening intensity |
🎬 Streaming Example: “Sharpen your webcam feed to look crisp even after compression.”
🎯 Tips: Keep strength between 1-3 for natural results. Higher values can make edges look harsh or introduce halo artifacts.
Color Replace
Section titled “Color Replace”💡 Simple Explanation: Swaps one color for another throughout the image.
⚙️ Technical Description: Identifies pixels matching a key color within a threshold and replaces them with a target color.
📖 Full Details & Properties
🔧 How It Works: Pixels similar to the key color (within the threshold) are replaced with the target color. Higher threshold values match a wider range of similar colors. Boost increases the intensity of the replacement.
✨ Perfect For:
- Changing brand colors across assets
- Recoloring specific elements
- Creative color swaps
📋 Properties:
| Property | Type | Range | Default | Description |
|---|---|---|---|---|
| Key Color | Color | - | Green | The color to find and replace |
| Target Color | Color | - | Green | The replacement color |
| Threshold | Float | 0 to 9 | 2 | How similar colors must be to match |
| Boost | Float | 1 to 16 | 1 | Intensity multiplier for replacement |
🎬 Streaming Example: “Change the blue in your logo to red for a special event without editing the source file.”
🎯 Tips: Start with a low threshold and increase until you capture the desired color range without affecting other areas.
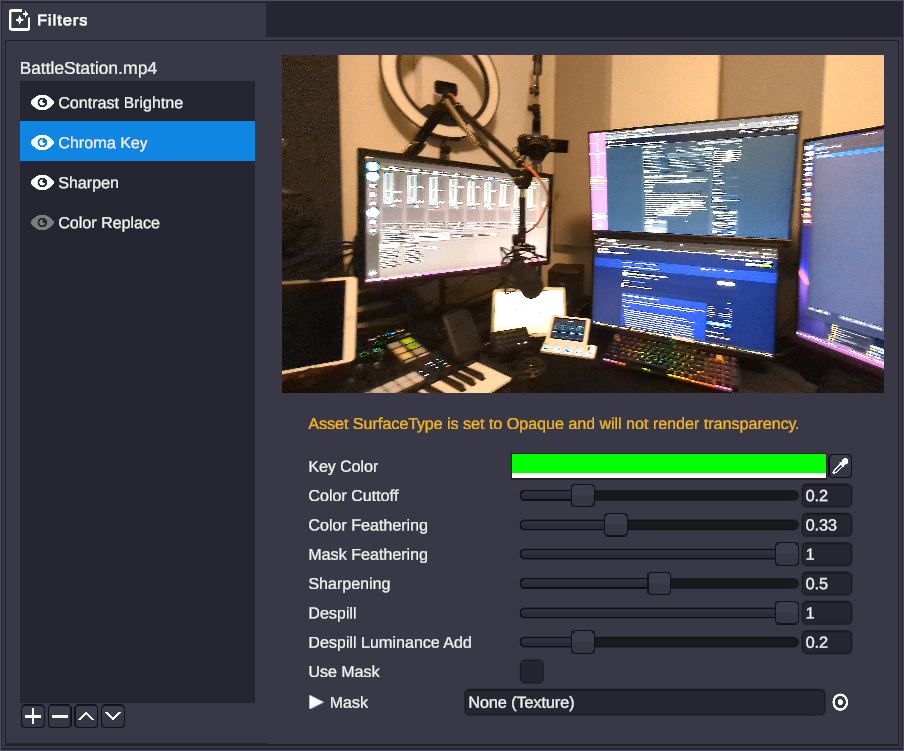
Chroma Key (Green Screen)
Section titled “Chroma Key (Green Screen)”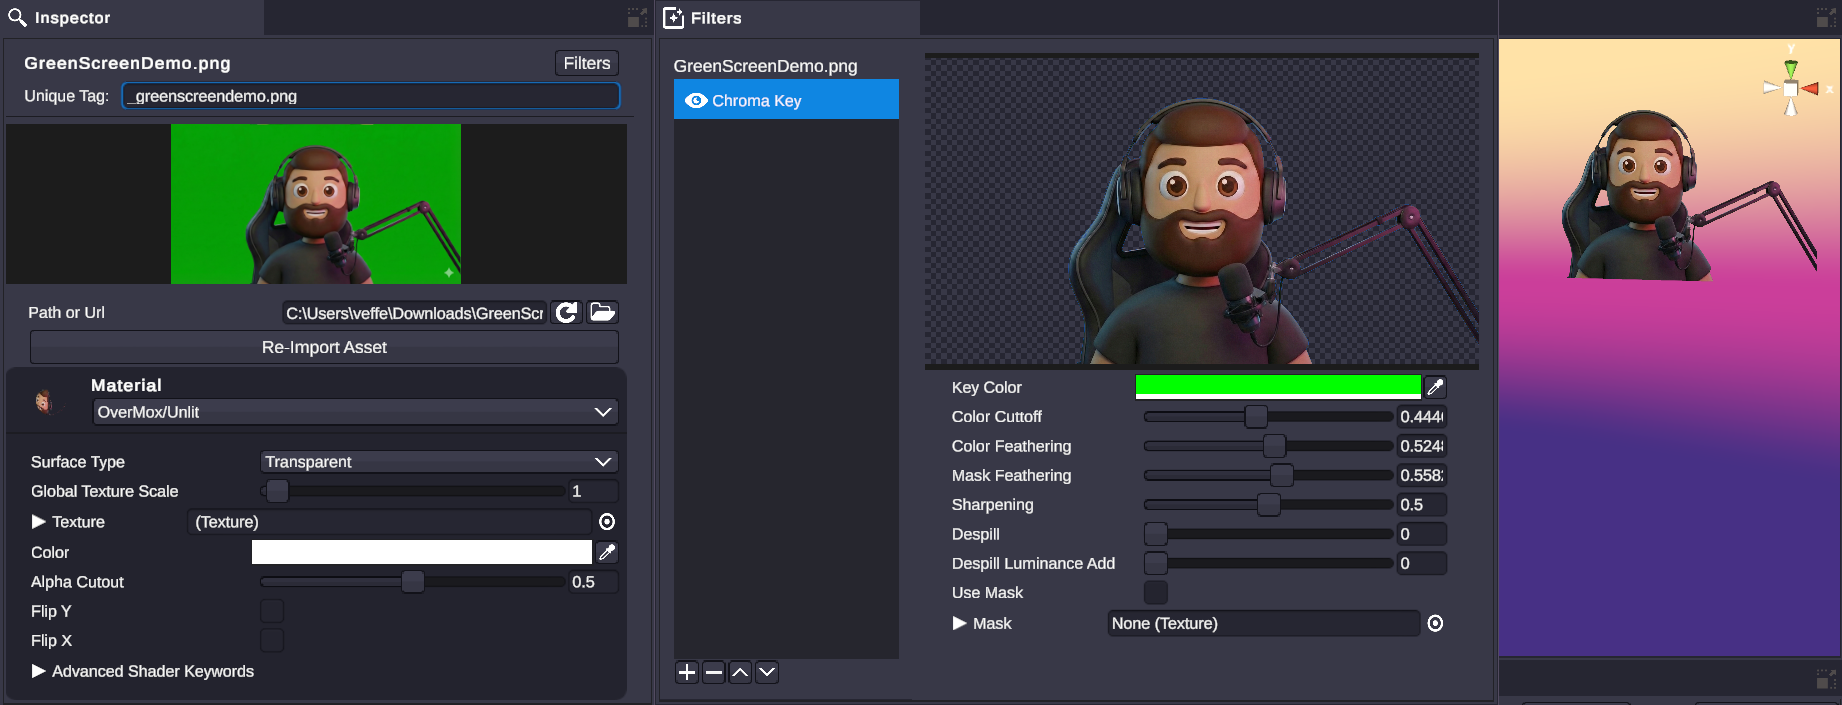
💡 Simple Explanation: Removes a solid color background (green screen removal).
⚙️ Technical Description: Advanced chroma keying with color cutoff, feathering, edge refinement, and color spill suppression.
📖 Full Details & Properties
🔧 How It Works: The filter identifies pixels matching the key color and makes them transparent. Color cutoff sets the threshold for what counts as the key color. Feathering creates smooth edges rather than harsh cutouts. Despill removes color contamination where the background color reflects onto your subject.
✨ Perfect For:
- Green screen removal
- Blue screen removal
- Removing any solid color background
📋 Properties:
| Property | Type | Range | Default | Description |
|---|---|---|---|---|
| Key Color | Color | - | Green | The background color to remove |
| Color Cutoff | Float | 0 to 1 | 0.2 | Threshold for color matching |
| Color Feathering | Float | 0 to 1 | 0.33 | Edge softness |
| Mask Feathering | Float | 0 to 1 | 1 | Mask edge softness |
| Sharpening | Float | 0 to 1 | 0.5 | Edge sharpness |
| Despill | Float | 0 to 1 | 1 | Remove color spill from subject |
| Despill Luminance Add | Float | 0 to 1 | 0.2 | Brightness compensation for despill |
🎬 Streaming Example: “Remove the green screen behind your webcam to overlay yourself on your game footage.”
🎯 Tips: Light your green screen evenly for best results. Start with default values and adjust Color Cutoff first, then fine-tune feathering. If you see green edges on your subject, increase Despill.
Channel
Section titled “Channel”Manipulate individual color channels for advanced color effects.
Channel Invert
Section titled “Channel Invert”💡 Simple Explanation: Flips all colors to their opposites (like a photo negative).
⚙️ Technical Description: Inverts RGB color channels, producing the complementary color for each pixel.
📖 Full Details & Properties
🔧 How It Works: Each color value is subtracted from 1 (or 255 in 8-bit terms). White becomes black, red becomes cyan, etc. This creates a classic negative effect.
✨ Perfect For:
- Dramatic visual effects
- Creating negative versions of graphics
- Artistic transitions
📋 Properties: This filter has no adjustable properties - it simply inverts all channels.
🎬 Streaming Example: “Flash your scene to inverted colors when something shocking happens in-game.”
🎯 Tips: Combine with other filters for creative effects. Invert twice to return to original colors (useful for A/B comparisons in filter stacks).
Channel Mixer
Section titled “Channel Mixer”💡 Simple Explanation: Lets you blend color channels together for creative color effects.
⚙️ Technical Description: A 3x3 matrix that remaps how RGB input channels contribute to RGB output channels.
📖 Full Details & Properties
🔧 How It Works: Each output channel (Red, Green, Blue) can pull from any combination of input channels. For example, you can make the output red channel come from 50% input red + 50% input blue. This enables sophisticated color grading and channel swapping.
✨ Perfect For:
- Advanced color grading
- Creating color blindness simulations
- Artistic channel swaps
- Film emulation looks
📋 Properties:
| Property | Type | Range | Default | Description |
|---|---|---|---|---|
| Red → Red | Float | -2 to 2 | 1 | Red input to red output |
| Red → Green | Float | -2 to 2 | 0 | Green input to red output |
| Red → Blue | Float | -2 to 2 | 0 | Blue input to red output |
| Green → Red | Float | -2 to 2 | 0 | Red input to green output |
| Green → Green | Float | -2 to 2 | 1 | Green input to green output |
| Green → Blue | Float | -2 to 2 | 0 | Blue input to green output |
| Blue → Red | Float | -2 to 2 | 0 | Red input to blue output |
| Blue → Green | Float | -2 to 2 | 0 | Green input to blue output |
| Blue → Blue | Float | -2 to 2 | 1 | Blue input to blue output |
🎬 Streaming Example: “Create a vintage film look by mixing channels to simulate old color processes.”
🎯 Tips: The identity matrix (1s on diagonal, 0s elsewhere) leaves colors unchanged. Try swapping channels (Red→Red=0, Red→Blue=1) for creative effects.
Channel Import
Section titled “Channel Import”💡 Simple Explanation: Replace color channels with channels from another image.
⚙️ Technical Description: Imports individual channels from an external texture, with channel remapping and optional inversion.
📖 Full Details & Properties
🔧 How It Works: You can assign any channel from the source texture (or special values like solid white/black) to any output channel. This lets you composite alpha channels from separate images, use grayscale maps, or create complex channel combinations.
✨ Perfect For:
- Adding alpha channels from separate masks
- Creating composite textures
- Advanced masking workflows
📋 Properties:
| Property | Type | Description |
|---|---|---|
| Texture | Texture | The source texture to import channels from |
| Tint | Color | Color multiplier for the imported texture |
| Red | Dropdown | Which source channel maps to red output |
| Green | Dropdown | Which source channel maps to green output |
| Blue | Dropdown | Which source channel maps to blue output |
| Alpha | Dropdown | Which source channel maps to alpha output |
Channel Options: Skip, Red, Invert Red, Green, Invert Green, Blue, Invert Blue, Alpha, Invert Alpha, One (white), Zero (black)
🎬 Streaming Example: “Import an alpha channel from a separate mask image to create complex transparency effects.”
🎯 Tips: Use “Skip” to leave a channel unchanged from the original image. “One” and “Zero” are useful for forcing channels to full white or black.
Soften images with various blur effects.
Gaussian Blur
Section titled “Gaussian Blur”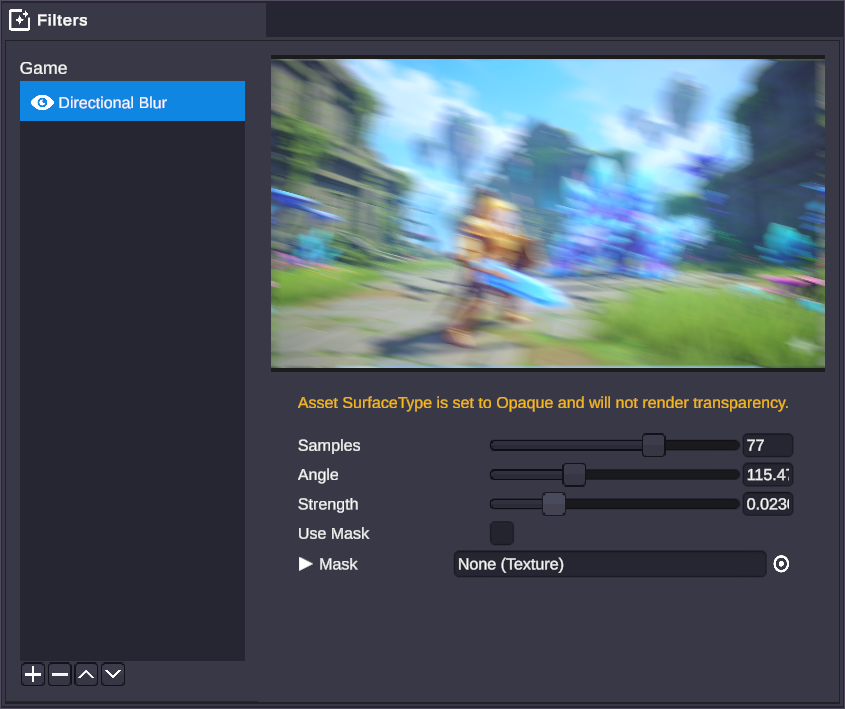
💡 Simple Explanation: Creates a smooth, even blur effect.
⚙️ Technical Description: Standard Gaussian blur using configurable sample count, blur radius, and standard deviation.
📖 Full Details & Properties
🔧 How It Works: Each pixel is averaged with surrounding pixels using a bell-curve (Gaussian) weighting. Pixels closer to the center contribute more than distant ones. More samples and larger blur size create stronger blur at the cost of performance.
✨ Perfect For:
- Blurring backgrounds
- Softening harsh edges
- Creating depth-of-field effects
- Privacy blur for sensitive information
📋 Properties:
| Property | Type | Range | Default | Description |
|---|---|---|---|---|
| Samples | Integer | 1 to 4 | 3 | Number of blur passes (higher = smoother) |
| Blur Size | Float | 0 to 0.1 | 0 | Radius of the blur effect |
| Standard Deviation | Float | 0 to 0.1 | 0.02 | Controls blur falloff curve |
🎬 Streaming Example: “Blur your desktop capture to hide sensitive information when switching scenes.”
🎯 Tips: Start with Blur Size at 0.01-0.02 for subtle effects. Increase Samples if you see banding artifacts in the blur.
Directional Blur
Section titled “Directional Blur”💡 Simple Explanation: Creates a motion blur effect in one direction.
⚙️ Technical Description: Linear motion blur along a specified angle, simulating camera or object motion.
📖 Full Details & Properties
🔧 How It Works: Pixels are smeared along a line at the specified angle, creating the appearance of motion. Higher sample counts create smoother blur trails. Strength controls how far the blur extends.
✨ Perfect For:
- Speed effects
- Simulating motion
- Dynamic transitions
- Action emphasis
📋 Properties:
| Property | Type | Range | Default | Description |
|---|---|---|---|---|
| Samples | Integer | 30 to 100 | 50 | Quality of the blur (higher = smoother) |
| Angle | Float | 0 to 360 | 90 | Direction of the blur in degrees |
| Strength | Float | 0 to 0.1 | 0.05 | Intensity of the blur effect |
🎬 Streaming Example: “Add horizontal motion blur to your transition graphics for a sense of speed.”
🎯 Tips: 0° is horizontal right, 90° is vertical up. Use with animations for convincing motion effects.
Radial Blur
Section titled “Radial Blur”💡 Simple Explanation: Creates a zoom or spin blur radiating from a center point.
⚙️ Technical Description: Blur that radiates outward from a configurable pivot point, creating zoom or spiral effects.
📖 Full Details & Properties
🔧 How It Works: Pixels are blurred along lines radiating from the pivot point. The effect is stronger further from the center, creating a zoom or tunnel effect. Negative radius values reverse the direction.
✨ Perfect For:
- Dramatic zoom effects
- Warp/teleport transitions
- Focus attention on center
- Hyperspace/speed effects
📋 Properties:
| Property | Type | Range | Default | Description |
|---|---|---|---|---|
| Samples | Integer | 1 to 100 | 16 | Quality of the blur |
| Pivot | Vector2 | 0 to 1 | (0.5, 0.5) | Center point of the blur (UV coordinates) |
| Strength | Float | 0 to 1 | 0.25 | Intensity of the blur |
| Radius | Float | -1 to 1 | 0.25 | Size and direction of blur rays |
🎬 Streaming Example: “Create a dramatic zoom blur when transitioning into gameplay.”
🎯 Tips: Pivot (0.5, 0.5) centers the effect. Move the pivot to blur toward different areas. Negative radius creates an inward zoom effect.
Generate
Section titled “Generate”Create new textures and patterns from scratch.
Generate Gradient
Section titled “Generate Gradient”💡 Simple Explanation: Creates a smooth color gradient from left to right.
⚙️ Technical Description: Generates a horizontal linear gradient between two colors with adjustable center point.
📖 Full Details & Properties
🔧 How It Works: Creates a new image that fades from the left color to the right color. The center property controls where the midpoint of the gradient falls. This replaces the original image entirely.
✨ Perfect For:
- Creating background textures
- Color transition effects
- Base layers for other filters
📋 Properties:
| Property | Type | Range | Default | Description |
|---|---|---|---|---|
| Left Color | Color | - | White | Starting color (left side) |
| Right Color | Color | - | White | Ending color (right side) |
| Center | Float | 0 to 1 | 0.25 | Position of gradient midpoint |
🎬 Streaming Example: “Generate a gradient background that transitions from your brand’s primary to secondary color.”
🎯 Tips: This filter generates a new image, so it ignores the original. Use it as the first filter in a stack, then apply other filters on top.
Generate Grid
Section titled “Generate Grid”💡 Simple Explanation: Creates a grid pattern overlay.
⚙️ Technical Description: Generates a customizable grid pattern with configurable colors, line count, and width.
📖 Full Details & Properties
🔧 How It Works: Generates a grid of horizontal and vertical lines over a solid background. You control the number of cells, line thickness, colors, and opacity.
✨ Perfect For:
- Design grids and guides
- Retro/pixel aesthetics
- Graph paper backgrounds
- Technical overlays
📋 Properties:
| Property | Type | Range | Default | Description |
|---|---|---|---|---|
| Color | Color | - | Black | Grid line color |
| Background Color | Color | - | White | Background fill color |
| Horizontal Count | Float | - | 10 | Number of horizontal divisions |
| Vertical Count | Float | - | 10 | Number of vertical divisions |
| Line Width | Float | - | 8 | Thickness of grid lines in pixels |
| Opacity | Float | 0 to 1 | 1 | Overall grid opacity |
🎬 Streaming Example: “Add a subtle grid overlay to your design stream for a technical aesthetic.”
🎯 Tips: Use low opacity for subtle guide lines. Combine with other filters for complex pattern effects.
Add various noise and grain effects.
Noise Gradient
Section titled “Noise Gradient”💡 Simple Explanation: Creates animated flowing noise that shifts between two colors.
⚙️ Technical Description: Animated gradient noise pattern with scrolling capability.
📖 Full Details & Properties
🔧 How It Works: Generates a smooth noise pattern that flows between two colors. The scroll property animates the noise over time, creating a flowing effect.
✨ Perfect For:
- Animated backgrounds
- Lava/fire effects
- Abstract motion graphics
- Dynamic overlays
📋 Properties:
| Property | Type | Default | Description |
|---|---|---|---|
| Left Color | Color | Green | First gradient color |
| Right Color | Color | Red | Second gradient color |
| Offset | Float | 0 | Pattern offset |
| Scroll | Vector2 | (1, 0) | Animation speed and direction |
🎬 Streaming Example: “Create a flowing lava background for your ‘be right back’ screen.”
🎯 Tips: Set scroll to (0, 0) for static noise. Animate offset over time with node graphs for custom animation curves.
Noise Pixelated
Section titled “Noise Pixelated”💡 Simple Explanation: Creates blocky, animated static noise.
⚙️ Technical Description: Generates pixelated noise pattern with configurable scale and scrolling animation.
📖 Full Details & Properties
🔧 How It Works: Creates a grid of random color blocks that can animate over time. Scale controls the block size, scroll animates the pattern.
✨ Perfect For:
- Retro/glitch effects
- TV static simulation
- Digital noise overlays
- Pixel art aesthetics
📋 Properties:
| Property | Type | Default | Description |
|---|---|---|---|
| Color 1 | Color | Black | First noise color |
| Color 2 | Color | White | Second noise color |
| Scale | Vector2 | (10, 10) | Size of noise blocks |
| Scroll | Vector2 | (0.05, 0) | Animation speed and direction |
🎬 Streaming Example: “Add retro TV static to your ‘technical difficulties’ screen.”
🎯 Tips: Lower scale values create larger blocks. Use matching colors at different brightnesses for subtle texture.
Noise Grainy
Section titled “Noise Grainy”💡 Simple Explanation: Adds film grain texture to your image.
⚙️ Technical Description: Fine-grained noise pattern simulating analog film grain.
📖 Full Details & Properties
🔧 How It Works: Overlays a fine, random noise pattern that simulates the grain found in analog film. The scroll property animates the grain for a realistic film look.
✨ Perfect For:
- Cinematic film looks
- Vintage/retro aesthetics
- Adding texture to flat images
- Hiding banding artifacts
📋 Properties:
| Property | Type | Default | Description |
|---|---|---|---|
| Color 1 | Color | Black | Dark grain color |
| Color 2 | Color | White | Light grain color |
| Offset | Float | 0 | Pattern offset |
| Scroll | Vector2 | (1, 0) | Animation speed and direction |
🎬 Streaming Example: “Add subtle film grain to your webcam for a cinematic streaming look.”
🎯 Tips: Keep colors close together (dark gray and light gray) for subtle grain. Wider color ranges create more visible noise.
Artistic effects, transforms, and special filters.
Oil Painting
Section titled “Oil Painting”💡 Simple Explanation: Makes your image look like an oil painting.
⚙️ Technical Description: Applies a painterly effect by grouping similar colors into brush-stroke-like regions.
📖 Full Details & Properties
🔧 How It Works: The filter analyzes color regions and simplifies them into paint-like strokes. Higher radius values create larger, more abstract strokes.
✨ Perfect For:
- Artistic transformations
- Stylized scene backgrounds
- Creative transitions
- Portrait effects
📋 Properties:
| Property | Type | Range | Default | Description |
|---|---|---|---|---|
| Radius | Float | 0 to 16 | 4 | Brush stroke size |
🎬 Streaming Example: “Transform your webcam into a living oil painting for an artistic streaming aesthetic.”
🎯 Tips: Higher radius values are more stylized but lose detail. Use moderate values (3-6) to maintain recognizable features.
Pixelate
Section titled “Pixelate”💡 Simple Explanation: Creates a mosaic/pixel effect by reducing resolution.
⚙️ Technical Description: Reduces effective resolution by grouping pixels into larger blocks of uniform color.
📖 Full Details & Properties
🔧 How It Works: The image is divided into a grid, and each cell is filled with a single color (averaged from the original pixels). Shape controls whether cells are rectangular or triangular.
✨ Perfect For:
- Retro pixel art looks
- Privacy/censorship blur alternative
- Stylized transitions
- Lo-fi aesthetics
📋 Properties:
| Property | Type | Default | Description |
|---|---|---|---|
| Count X | Float | 20 | Number of horizontal cells |
| Count Y | Float | 20 | Number of vertical cells |
| Shape | Dropdown | Rectangle | Cell shape (Rectangle or Triangle) |
🎬 Streaming Example: “Pixelate your game capture during loading screens for a stylized transition.”
🎯 Tips: Lower counts create larger pixels (more pixelated). Use triangle shape for a unique crystallized look.
Texture Bombing
Section titled “Texture Bombing”💡 Simple Explanation: Scatters copies of a texture randomly across the image.
⚙️ Technical Description: Randomly places multiple instances of a texture at varying positions and scales.
📖 Full Details & Properties
🔧 How It Works: Takes a source texture and creates multiple copies scattered across the image at random positions and scales. Each copy is independently randomized.
✨ Perfect For:
- Confetti effects
- Scattered element overlays
- Particle-like static effects
- Decorative patterns
📋 Properties:
| Property | Type | Default | Description |
|---|---|---|---|
| Bomb Texture | Texture | None | The texture to scatter |
| Count | Integer | 10 | Number of texture copies |
| Min Max Scale | Vector2 | (2, 10) | Random scale range (min, max) |
🎬 Streaming Example: “Scatter star graphics across your celebration overlay when someone subscribes.”
🎯 Tips: Use textures with transparency for best results. Adjust count and scale to balance density and performance.
Glowing Edges
Section titled “Glowing Edges”💡 Simple Explanation: Makes edges glow with a neon-like effect.
⚙️ Technical Description: Detects edges in the image and applies a glowing highlight effect.
📖 Full Details & Properties
🔧 How It Works: Edge detection identifies boundaries between different colors, then applies a glow effect along those edges. Strength controls glow intensity, while saturation and lightness adjust the glow color.
✨ Perfect For:
- Neon/cyberpunk aesthetics
- Artistic edge highlighting
- Stylized portraits
- Sci-fi effects
📋 Properties:
| Property | Type | Range | Default | Description |
|---|---|---|---|---|
| Strength | Float | 0.1 to 8 | 1 | Glow intensity |
| Saturation | Float | 0 to 1 | 0 | Color saturation of the glow |
| Lightness | Float | 0 to 1 | 0.5 | Brightness of the glow |
🎬 Streaming Example: “Add a neon glow effect to your webcam for a cyberpunk streaming aesthetic.”
🎯 Tips: Higher strength creates more visible but potentially noisy edges. Combine with other color filters for custom glow colors.
Tiling and Offset
Section titled “Tiling and Offset”💡 Simple Explanation: Repeats and shifts the image.
⚙️ Technical Description: Tiles the texture and applies UV offset for scrolling or repeating patterns.
📖 Full Details & Properties
🔧 How It Works: Tiling repeats the image multiple times across the frame. Offset shifts the image position, wrapping around edges. Use with animated offset values for scrolling effects.
✨ Perfect For:
- Creating repeating patterns
- Scrolling backgrounds
- Texture tiling
- Animated backgrounds
📋 Properties:
| Property | Type | Default | Description |
|---|---|---|---|
| Tiling | Vector2 | (1, 1) | Repetition count (X, Y) |
| Offset | Vector2 | (0, 0) | Position shift (UV coordinates) |
🎬 Streaming Example: “Create a scrolling cloud background by animating the offset over time.”
🎯 Tips: Tiling (2, 2) creates a 2x2 grid of the image. Animate offset with node graphs for scrolling backgrounds.